Aero enterprises
aerobatic instruction
Okay, let’s get this out of the way with first. Here’s my sage advice (read disclaimer). Don’t try any of these figures in an airplane not certificated for aerobatic flight; nor should you attempt to fly these figures without first getting some dual instruction from a qualified flight instructor. A normal or utility category airplane cannot handle the stresses of aerobatic flight without either damage or structural failure. A qualified instructor will take you through the figures in a methodical manner, identifying how the figures should be flown, common errors, and what to do if things go wrong. This discussion is not to be used in lieu of the noted dual instruction in an airplane certificated in the acrobatic category.
Let’s introduce you to the basic aerobatic figures. Excluding some of the more drastic tumbling maneuvers, there are essentially five basic figures:
1. Straight lines: Upright, inverted, horizontal, vertical, and 45° up and down2. Loops: Inside, outside, hesitation, square...
3. Rolls: Aileron, slow/compeition, hesitation, snap...
4. Spins: Upright, inverted
5. Hammerhead turns
There are a multitude of combinations of these maneuvers. The International Aerobatic Club (IAC), a division of the EAA, lists on its Aerobatic Figures web page a few of the many figures.
aileron & slow rolls
It’s a fairly easy figure to perform and introduces you to unusual attitudes without putting a lot of stress on your body (about 1g). The path of the longitudinal axis of the airplane is helical or corkscrew as we roll 360°. We begin this maneuver at 120 mph in level flight (all our maneuvers start out in level flight). To get there in the Decathlon, we enter a shallow dive, achieve the desired airspeed, maneuver to level flight, then aft elevator to pitch the airplane up ~30 and neutralize the elevator (preventing over-rotation). We’ll immediately roll left with full left aileron, while we maintain that neutral elevator. Not much to do but watch the view as we roll 360°! Just prior to wings level, move the left-most stick robustly back to the neutral aileron position. Congratulations, you’ve done your first roll!
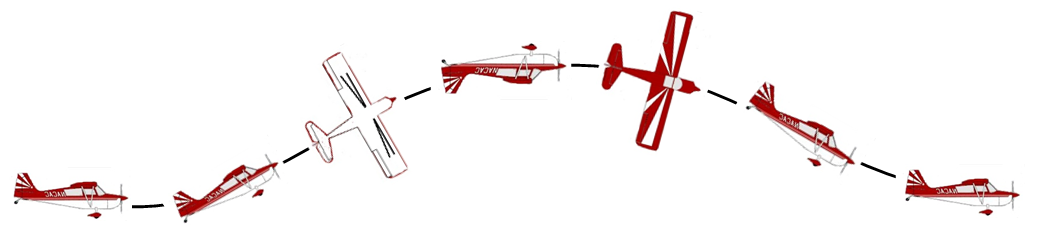
Here’s an outline of steps to perform an aileron roll:
1. Dive to 130 mph entry speed, then return to level flight.2. Pitch up to 30° above the horizon and neutralize elevator.
3. Full left aileron and maintain it. Hold on for the ride!
4. Neutralize aileron just before the wings are level.
The slow roll is a lot different and more challenging than the aileron roll. It requires that you blend all the flight controls through 360° rotation along the longitudinal axis.
Here are the basics for the slow roll:
1. Entry speed is 120 mph in level flight.2. Full aileron combined with a small amount of aft elevator.
3. As the airplane approaches the first knife edge, add top rudder.
4. While rolling with full aileron, add forward stick.
5. At inverted flight, switch feet for top rudder to the next knife edge.
6. When back to upright flight, controls go to neutral.
Play the following video to get the forward and side views of the figure.
loop
The loop is a whole lot of fun, and pretty easy to do (let’s face it, all the figures are a lot of fun). However it’s a challenge to make the loop a symmetrical circle as one would view it from the ground. We’ll look for a straight road or other landmark over which to perform the figure. Lining up on the road, we dive to our entry speed of 140 mph. All our figures begin from level flight. Once there, we neutralize the controls (slight forward pressure to maintain level flight), then pull the stick back in a steady to-your-belly motion to achieve about 3.5 – 4.0 g’s while looking out the front windshield. We’ll do this without focusing on the G-meter, letting our body tell us when we’ve got the desired acceleration (after checking the G-meter after the maneuver) and by memorizing the stick position (we’ll use this entry stick position on our way down prior to figure exit). Once the horizon disappears under the airplane’s nose, we look left and watch our wing rotate about the horizon. The challenge here is to move and maintain the aft stick without inputting any aileron. Small corrections can be made to ensure the wing tip tracks about the horizon. You maintain the aft stick position until the 120° point in the loop. At this point, we look back to the windscreen and greenhouse roof and begin reducing the aft pressure. We “float” over the top of the loop. Failure to reduce back pressure around the 120° mark would pinch the loop, giving it a hairpin appearance from the ground. As we progress through the second half of the loop our progress can be tracked using the road over which we’ve selected, giving us an idea of our alignment (make corrections with rudder). About 40° past the peak of the loop, our speed increases quickly and we begin aft elevator pressure. Remember the position on the first elevator pull in the beginning? We reproduce it on the way down, ending the maneuver at the same altitude as in the beginning.
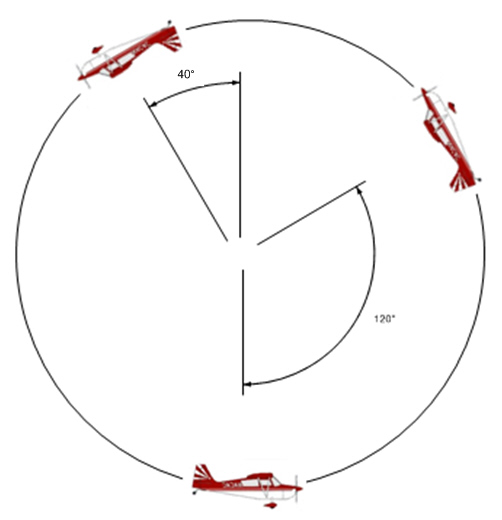
1. Align over a straight line reference point, dive for 140 mph, level flight.
2. Smooth, steady, straight-back elevator pull to 3.5 – 4.0 G’s.
3. Look to the left wing after the horizon disappears under the nose.
4. Begin to release back elevator at the 120° and float over the top .
5. Begin the smooth, steady elevator pull at 40° past the top of the loop.
6. Maintain the aft stick until at the bottom of the loop; then release for level flight.
Take a look at this short video of the loop to help get an idea of the sight pictures out the windshield and looking left.
This is just a start. There’s a whole bunch of figures to learn. We’ll do some inverted flight so you can see how the airplane flies upside down. You’ll perform turns, climbs, and descents, just like in upright flight. The slow, or competition roll maintains a straight flight path. The figure blends all flight controls to do this as the airplane rolls 360°. We’ll try some spins, entering on a heading, and exiting on a heading. You’ll be amazed that you can precisely control the airplane. Next, we’ll combine some elements of these figures, performing the Immelman, a half loop with a half-roll at the top. Half Cuban eights; five-eights of a loop with a 45° downline, a half-roll, 45° downline of equal length to a horizontal exit. We can put these all together to perform the Primary sequence as judged at aerobatic competitions. If you feel inspired, there’s a whole lot of other figures we can perform: Clovers, hammerhead turns, sharks tooth, humpty bump, gold fish…
Here's a basic aerobatics syllabus I use for my aerobatic instruction course.
